Good image composition, including subject positioning, is key when selecting an image.
On this page, we're going to cover the basics of image selection, editing, naming, and positioning. While these concepts are easy to understand and do, mastering them and keeping to best practices can take a website from looking ok to stellar. As such, we encourage you to refer back to this page whenever you need.
Planning What Images You Need
Before you start creating your page, it is a good idea to get yourself organized and have some of the images for the page on hand.
Every page needs a thumbnail image. You will need this to be able to create your page in the first place! Thumbnail images show up when your page is linked to on social media or in news lists. A good thumbnail image will increase your content's search rank and appeal to potential readers.
Every page will need either:
- a hero image (for basic pages)
- a header image (for landing pages)
- or one or more slider images (for interactive headers on landing pages)
Each of these image types takes its place at the top of the page. This is not needed to save your page, as every site has a default image for this. However, best practice is to change this image promptly to match the content of your page.
You will also need whatever featured or embedded images you want for the content of the page.
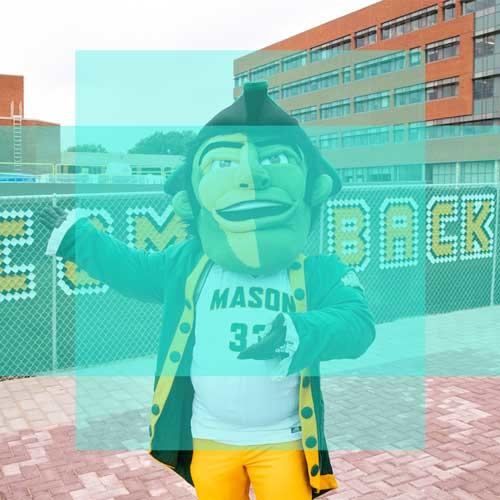
This photo of the patriot is cropped to a 1:1 ratio, i.e. square. The colored overlay approximates the "safe crop" area of various social media platforms with the Patriot Mascot's head, shoulders, and jersey visible in the safe zone. When choosing and cropping your photo, keep in these safe areas in mind.
Selecting Images
The SiteMasonry platform uses responsive web design. This means your images will change size in response to the dimensions and shape of the screen they are being displayed on. Think of how a website looks on your computer versus your phone. Choose images that render well on all screen sizes. Here are a few guidelines:
- In most instances, you will want the main subject to appear in the middle third of the photo.
- If there are people in the photo, you will want them positioned so that the entire image shows subjects from the waist or shoulders up. The subjects' face(s) should be close to the middle third of the photo.
- Do not put photos that are blurry, crooked, upside-down, or otherwise weird on your page.
- We advise header images have some darkness at the bottom. The title of the page is, by default, white and goes on top of the picture on the bottom left side. If there is not enough contrast with your image, your title may not be legible.
If a photo does not meet standards, you can sometimes edit the photo to correct for these things, such as crookedness or positioning of the subject. However, editing your photo can create situations where the resolution becomes too low, causing the image to become blurry at specific sizes.
Image Dimension and Size Requirements
Different images will need to be different shapes and sizes to properly display on the site. The aspect ratio refers to the shape of the image, displaying width and height in relation to each other. The dimensions in pixels are in regards to how big the image is. Meeting the minimum dimensions of the image helps ensure the photo will not become blurry due to resizing.
Header, Slide, Hero, Featured, Embedded, and Mosaic Tile images must be must be 2 MB or smaller. Page Thumbnail and Profile Headshot images must be 1 MB or smaller.
| Thumbnail Images 1:1 square |
Max 600 by 600 pixels Min 400 by 400 pixels |
| Header Images 30:13 rectangle |
Max 3000 by 1300 pixels Min 2600 by 1127 pixels |
| Slide Images 16:9 rectangle |
Max 3000 by 1688 pixels Min 2600 by 1463 pixels |
| Hero Images 9:1 rectangle |
Max 3000 by 210 pixels Min 1890 by 210 pixels |
| Profile Images 1:1 square |
Max 600 by 600 pixels Min 300 by 300 pixels |
| Embedded Images | Max width 800 pixels Min width 400 pixels |
| Featured Images | Ideal Ratios: 4:5, 16:9, 1:1 |
Editing Images
This tutorial is tailored towards the use of Adobe Photoshop. For more information on getting access to this software, please reference Information Technology Services for full details. These steps can be replicated with any number of photo editing tools, but the exact tools and steps may differ.
Size your crop tool to the ratio relevant to your image needs, and position your photo so as to frame the subject properly. Complete your crop and your image is ready to export!
Organizing Images
When you save and upload your images, it becomes very important to name your images for easy identification later. Using uniform naming conventions will help you to locate images later on. For example, you might use the naming scheme of:

subject_of_photo_ratio_photo_number.jpg
ex: george_mason_statue_1x1_0001.jpg
This information helps you to not only search by subject of the photo, but also know the image ratio at a glance. This is particularly handy if you want to make sure two or more similarly shaped images are the same ratio. The photo number is useful if you got your photo from the Photo Library. Most photos there are saved with a file name that is just the photo number. Keeping that number on your edited image can help you find the original later on.
Positioning Images
Featured and embedded images require specific positioning in order to take full advantage of their features. Featured images will take up the full width of the content area they are placed into. Embedded images can be set to specific preset sizes, and are placed within Basic Text elements.